Cut wire BSK Data & Electrical in Sydney from the ceiling hole to ensure that it's 6 inches long. Run the electrical wire right into the hole on the renovating electrical box as well as put the box right into the light switch up. Place the wire via the cord clamp on the real estate. Make use of an energy blade to cut 3 inches from the external insulation jack of each cable television end. This will reveal the wires and also basing wire that will be either bare copper or green.
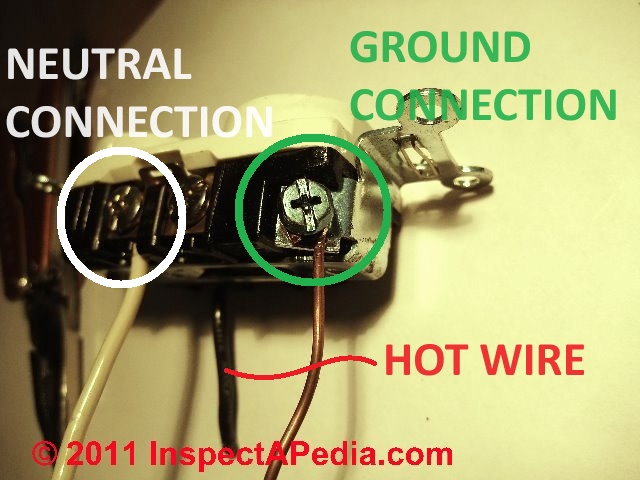
Most switches, this one included, have two gold screw connectors. The hot/black cable coming from the source of power connects to one gold terminal, while the hot/black wire going to the components connects to the others. Ground cords are turned with each other as well as likewise attached to the switch.
- Meticulously position the LED Driver up through the hole.
- If so, bear in mind to turn the power off as well as ensure all the cords are dead before you start adjusting.
- 1) Establish where you desire your lights set up and also note your ceiling accordingly.
- Use a renovation box that has built-in cord clamps.
If you're retrofitting an existing light, you could have to open up the dimension of the hole after getting rid of the old light. Hold completion of the brand-new white cable as much as the black cord of the junction box, turn the cords together and screw on a cable nut. For an electric outlet, wrap the white wire counterclockwise around the silver-colored screw and also tighten it with a screwdriver. So, you want to set up recessed lighting yet you do not intend to damage your ceiling in the process.
You'll Need Ports In The Ceiling For The Electrical Wiring And Also The Housings
I'm not sure about you, however I find https://www.openlearning.com/u/goold-qyuof4/blog/JustHowPowerGridsWork/ out best by seeing how something is done and then doing it myself. Because initiative, I have actually created a table top simulated up for electrical wiring recessed lights, in addition to actions and also thoughts for running this lighting configuration in a genuine residence atmosphere. Recessed illumination is an incredibly popular residence renovation task, as well as this article will help you better recognize the circuitry parts of this work. Screw the remodel recessed lighting component into the outlet situated inside the housing, then press the fixture into the housing up until it clicks into place.
This will likely be the most challenging part of the setup. You already know where your studs are so strategy to run your cables alongside the ceiling joists for the least amount of obstruction. Scam around 4 inches of cable sheathing with the cable ripper. Strip the covering from the wires inside the sheathing. Draw the wire right into the light's joint box and also make the connections.
Select The Right Circuit

Due to the fact that recessed lights is set up in the ceiling, it's simplest to place in prior to ceiling material increases-- throughout new building or a significant renovation. Recessed illumination created for new building is set up to be positioned up in the ceiling between the joists with installing brackets that get toenailed right into the strapping. They are after that wired to the source of power, and the drywall goes up over them. If you don't have total accessibility to the ceiling joists, you can still set up recessed illumination without excavating into way too much drywall. Simply look for recessed lights designed to fit with a tiny opening in the ceiling as well as placed to the drywall with clips rather than the joists as well as strapping.
Just How To Mount Recessed Lighting In 5 Actions
Finished rooms require renovating electric boxes or old-work boxes to install electrical outlets, light switches, as well as lights. Without an attic room, recessed lights should be mounted from below the ceiling rather than the top. Redesigning recessed light housing is the called for model for the job. Its cords are held inside an electrical box that is linked to a metal light can.
From there, determine whether your first fixture placements will need to be moved slightly to compensate for the stud locations. Remember, you need area for the entire size of the fixture plus a minimum of one more inch of area between the component as well as the stud. If you have to move one over a couple of inches, after that relocate the others slightly as well so they are all spaced evenly from each other. Location the cutting layout from the brand-new component over the opening for the electric box.
Consider the attic room to check where the wire came with. Ensure it is not too near to a joist or HVAC air duct. Thinking your placement will work, return to the space and utilize a drill and also recessed light hole cutter to make an opening for every recessed can. Hold the end of the new black cable to the black cord of the junction box and turn them with each other. Screw on a cable nut to protect the link, called a splice. To attach to an electric outlet, cover the black cord counterclockwise around the brass-colored terminal screw and tighten up the screw with a screwdriver.
Make certain the junction boxes on the redesigning real estates are provided for "through branch circuit wiring" so you can run at the very least one cable in and one bent on the following fixture. Some recessed light junction boxes enable more than 2 cords. Discover an existing box to make use of as a power source as well as turn off the power to the outlet at the primary electrical panel.